
Navigation
Install the app
How to install the app on iOS
Follow along with the video below to see how to install our site as a web app on your home screen.
Note: This feature may not be available in some browsers.
More options
Style variation
-
Welcome to the BMW R18 Forums. Member registration disables ads and allows you to post and share. Register Here.
You are using an out of date browser. It may not display this or other websites correctly.
You should upgrade or use an alternative browser.
You should upgrade or use an alternative browser.
What did you do to your R18 today?
- Discussion starter TodkaVonic
- Start date
crustyapo
New member
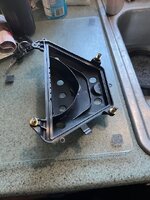
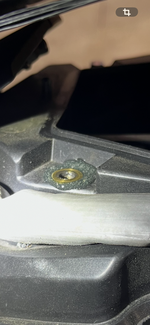
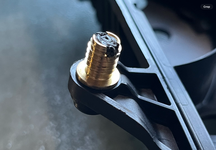
Performing a 6000mi service on a friends R18 Classic and joined here to find valve clearance and fastener torque specs as well as any general maintenance knowledge. This forum, like the others I am on, is a great resource. Started to remove the air filter and the threaded brass inserts for the air box lid backed out. I had to epoxy them back in and while searching this site found it has happened to others as well. Looking forward to searching the forum further.
Attachments
bdalameda
Well-known member
Those look like expansion inserts. They are designed to expand and lock in place when tight but are removable when loose. I could be wrong but that is what they look like.Performing a 6000mi service on a friends R18 Classic and joined here to find valve clearance and fastener torque specs as well as any general maintenance knowledge. This forum, like the others I am on, is a great resource. Started to remove the air filter and the threaded brass inserts for the air box lid backed out. I had to epoxy them back in and while searching this site found it has happened to others as well. Looking forward to searching the forum further.
HUNTS
Well-known member
- Joined
- Oct 4, 2023
- Messages
- 833
- Location
- Western Australia
- Bike
- 2025 Brooklyn Grey ‘Blacked Out’
Thank you… ordering it tomorrow.Easy ; loosen all bolts / tilt forward the upper oil cooler first before attempting to place the trim in situ.
crustyapo
New member
Those look like expansion inserts. They are designed to expand and lock in place when tight but are removable when loose. I could be wrong but that is what they look like.
They have a coarse external RH thread on them (like an “acme” thread). They use similar inserts on woodworking. There are a few different ways to put metal inserts into plastic parts.
https://www.ptonline.com/articles/four-ways-to-tackle-threaded-inserts-for-plastics
The notch in the bottom would lock the insert into place once the plastic around it had hardened. I highly doubt it was ever intended to be removed. Someone just over tightened the airbox cover screws and it pulled the insert out when I attempted to remove the cover.
Attachments

Manhattan Matte
Well-known member
crustyapo, same thing happened to me when changing the air filter for 6,000 service. Really frustrating to go through the laborious process of getting access to the air filter, only to have this problem happen to slow things down further. Next time, I'll switch to an aftermarket filter like the DNA Stage 2 that replaces the plastic intake box with a more robust metal bracket.
Mac
Active member
When you take the screws out of the BMW badge go careful. Mine just spun but I managed to back them out by adding some removal pressure to the badge with a plastic trim tool. The new screws went on with no issue.Thank you… ordering it tomorrow.
crustyapo
New member
I put some anti-seize on the airbox cover screws and didn’t reef them down like the last guy so they would come out with less effort next time. The DNA Stage 2 air filter mod looks interesting.crustyapo, same thing happened to me when changing the air filter for 6,000 service. Really frustrating to go through the laborious process of getting access to the air filter, only to have this problem happen to slow things down further. Next time, I'll switch to an aftermarket filter like the DNA Stage 2 that replaces the plastic intake box with a more robust metal bracket.

Star-Lord
Well-known member
I had thought about inserting riv-nuts vs epoxy as a final solution for the loose brass sleeves; however, I backed out the brass sleeves and dabbed some epoxy in place and reinserted the brass sleeve, which seemed to work well when I replaced my air filter for the 2nd time since ownership..
I'll get another look at them next weekend, where I'm planning on doing some annual maintenance in preparation for the change in season.
I'll get another look at them next weekend, where I'm planning on doing some annual maintenance in preparation for the change in season.
Star-Lord
Well-known member
I installed a new garage door opener in our garage, after it broke some 10 or 15 yrs ago...
I used double-sided 3M tape and placed one of the remotes on the underside of my fuel cap compartment... Fits perfectly - CHAMBERLAIN brand garage door - belt driven 3/4 HP.
No more jumping off the bike at the end of a long day's ride and manually lifing the door...
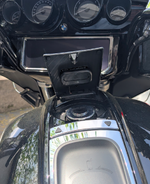
I used double-sided 3M tape and placed one of the remotes on the underside of my fuel cap compartment... Fits perfectly - CHAMBERLAIN brand garage door - belt driven 3/4 HP.
No more jumping off the bike at the end of a long day's ride and manually lifing the door...
HUNTS
Well-known member
- Joined
- Oct 4, 2023
- Messages
- 833
- Location
- Western Australia
- Bike
- 2025 Brooklyn Grey ‘Blacked Out’
Rode it, cleaned it and ready to order a black radiator cover, front engine cover trim (to match the cylinder guards) and front axle sliders tomorrow…. I don’t think that there is an end 


fleabag
Well-known member
I was just thinking that I’m at the end of my addiction to additions.Rode it, cleaned it and ready to order a black radiator cover, front engine cover trim (to match the cylinder guards) and front axle sliders tomorrow…. I don’t think that there is an end
Star-Lord
Well-known member
High Gloss Black Oil Cooler - I have a spare oil cooler and the plastic cover from the Bobber project... I may look into painting it high gloss black, maybe drop it off at a paint shop and use the R18 FE paint code and swap it for the existing cover and see how it looks...

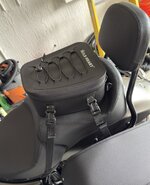
Found a waterproof tail bag that fits nicely.

- Joined
- Mar 30, 2023
- Messages
- 993
- Location
- Goolwa, Australia
- Bike
- R18 FE and RnineT Scrambler
Are you posting from the after life?I was just thinking that I’m at the end of my addiction to additions.

skidward
Active member
No need for an opener button if you have a MyQ-enabled opener. You can just use the app on your phone.I installed a new garage door opener in our garage, after it broke some 10 or 15 yrs ago...
I used double-sided 3M tape and placed one of the remotes on the underside of my fuel cap compartment... Fits perfectly - CHAMBERLAIN brand garage door - belt driven 3/4 HP.
No more jumping off the bike at the end of a long day's ride and manually lifing the door...
View attachment 20865
Star-Lord
Well-known member
Wi-Fi signal out to my garage is spotty at best..No need for an opener button if you have a MyQ-enabled opener. You can just use the app on your phone.
The app will do it over cell data too. So maybe hit it half-block away.Wi-Fi signal out to my garage is spotty at best..

Hey @Star-Lord, I just installed the $50 Meross gadget on my old Genie Intellicode garage motor and it’s honestly one of the best things I’ve ever bought! It works so smooth and is compatible with almost every brand. I finally ditched the physical remote. Now I just say 'Hey Siri' or 'Hey Alexa, open my garage door' and I'm in.Wi-Fi signal out to my garage is spotty at best..
If you're not in the mood to talk to Siri or Alexa, it also puts a sweet shortcut right on your iPhone home screen, so you can just tap the icon and the door opens instantly. To make sure the connection was solid, I grabbed the TP-Link Deco Mesh system from Amazon to kill the weak Wi-Fi in my garage. It’s super easy: you just plug one into your router and the other one near the garage. It’s total plug-and-play with no real installation hassle.
And like @emgarciax said, you don't actually need Wi-Fi outside your garage because it’s not a direct connection from your phone to the door. It goes: Phone (using mobile data) → Internet → Home Wi-Fi → Meross. Seriously, such a game changer!
HUNTS
Well-known member
- Joined
- Oct 4, 2023
- Messages
- 833
- Location
- Western Australia
- Bike
- 2025 Brooklyn Grey ‘Blacked Out’
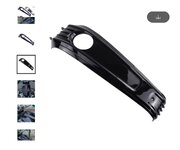
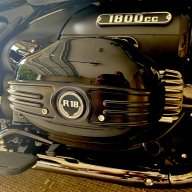
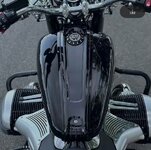 Whilst I’m waiting on my new bits to arrive, I was wondering if anyone has fit one of these to their bike?