- Joined
- Mar 23, 2023
- Messages
- 62
- Location
- 102 marchak Lane Greenfield TWP PA
- Bike
- 2022 R18TC
anyone add a rack to the top case of a R18 TC is there any wires on the lid that would be in the way of the bolts that will hole it in place !
Follow along with the video below to see how to install our site as a web app on your home screen.
Note: This feature may not be available in some browsers.
I did put a rack on from ailexpress cheap and fits great had to remove some plastic but wasnt to bad just so the head of the bolt would set flatKuryakyn Multi-Rack Adjustable Luggage Rack
(editrd for a hopefully more accurate installation description)
Just installed this, fits well, looks good, a bit finicky to get it all lined up & centered, other than that an easy installation.
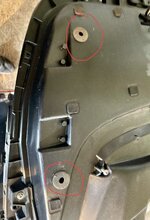
I suggest you look at mounting the FRONT stand-offs as far toward the rear of the top case as you can, while still ensuring strength & stability, to ensure tbe interior washers & screws are on the flat portions of the inside of the lid. There are protruding sections on each side of the inside of the lid, just forward of centerline, that you want to avoid.
Hope you like chrome because the black seem unavailable.
https://www.revzilla.com/motorcycle...ble-luggage-rack-for-harley-touring-1980-2016
I am going to add to this by linking a couple of photos from others on the site (who are also in this thread or have "liked" posts in the threads).Kuryakyn Multi-Rack Adjustable Luggage Rack
(editrd for a hopefully more accurate installation description)
Just installed this, fits well, looks good, a bit finicky to get it all lined up & centered, other than that an easy installation.
I suggest you look at mounting the FRONT stand-offs as far toward the rear of the top case as you can, while still ensuring strength & stability, to ensure tbe interior washers & screws are on the flat portions of the inside of the lid. There are protruding sections on each side of the inside of the lid, just forward of centerline, that you want to avoid.
Hope you like chrome because the black seem unavailable.
https://www.revzilla.com/motorcycle...ble-luggage-rack-for-harley-touring-1980-2016
")